Due to the new infrastructure upgrades in Chrome, my article no longer serves. You can use this article for working with Internet Explorer and previous versions of Chrome, Firefox, Safari, etc. But for the updated one, please have a look at one of the best articles - How to get HTTPS working on your local development environment in 5 minutes by my close friend Daksh Shah.
As a developer, it is always a pain to test the payment gateways and other applications securely in our localhost. 💻 Anything and everything, including Google Chrome, now asks you to have a secure URL that starts with 🔒 https://, which is a pain for most of the developers, as there’s a cost involved in it. For those who don’t know, we can create a self-signed certificate and make it trusted locally, to test out things. 😎
‼️ Use it only locally to test things out. Don’t use this in the production environment.
I am working currently on setting up a local payment gateway 💰, so I need to secure my domain, in order to make it work. I needed https://, but due to the IP restriction, I am unable to get one. So instead, I thought what if I am the certificate authority that signs the certificates? I understand that’s a crazy feel. 😈
The main reasons to create a secure website is for:
- Privacy (stop looking at my password).
- Integrity (data has not been altered in flight).
- Trust (you are who you say you are).
Creating the Certificate
There are a few things you need to do to get your http://localhost secured to https://localhost and without any warning (at least in your browser).
- Create a Root Certificate. This is done just once.
- Install the Root Certificate to the Trust Repository on the client machine.
- Create a Domain Certificate. This is done for every domain.
I am not sure if it is possible to create a Wildcard or Multi-Domain Validation Certificate at this point of writing this article. I am just going to do a demo of what I am doing currently with my Mac. 🖥
You need to have [OpenSSL](https://go.praveen.science/?redirect=https://www.openssl.org/" target="_blank) to create the certificates. This is installed with the system if you are using Mac or Linux. For Windows, please try [Win32 OpenSSL](https://go.praveen.science/?redirect=http://slproweb.com/products/Win32OpenSSL.html" target="_blank).
Creating a Root Certificate
Becoming an anonymous Root Certificate Authority is now made simple. 😜 Okay, jokes apart. You can't. This is local to your workstation or system, just to bypass some basic security validation! This is done only once.
Create the Root Key:
openssl genrsa -out rootCA.key 2048This key is the base key. Now with this, we will be signing the others. If you want to protect the key with a password, you can do so by adding the -des3 parameter.
openssl genrsa -des3 -out rootCA.key 2048You will be asked for a password. Make sure you use the same password to create the other keys.
Both the above processes generate a file, rootCA.key, which can be used to sign the other certificates. Now let's create the first self-signed certificate using the above generated key:
openssl req -x509 -new -nodes -key rootCA.key -sha256 -days 1024 -out rootCA.pemThe above command will be interactive, asking you a few questions. You can give the same as below:
Enter pass phrase for rootCA.key:
You are about to be asked to enter information that will be incorporated
into your certificate request.
What you are about to enter is what is called a Distinguished Name or a DN.
There are quite a few fields but you can leave some blank
For some fields there will be a default value,
If you enter '.', the field will be left blank.
-----
Country Name (2 letter code) [AU]: UK
State or Province Name (full name) [Some-State]: England
Locality Name (eg, city) []:Newcastle upon Tyne
Organization Name (eg, company) [Internet Widgits Pty Ltd]: PraveenTech
Organizational Unit Name (eg, section) []: Security
Common Name (e.g. server FQDN or YOUR name) []: PraveenTech Research Labs
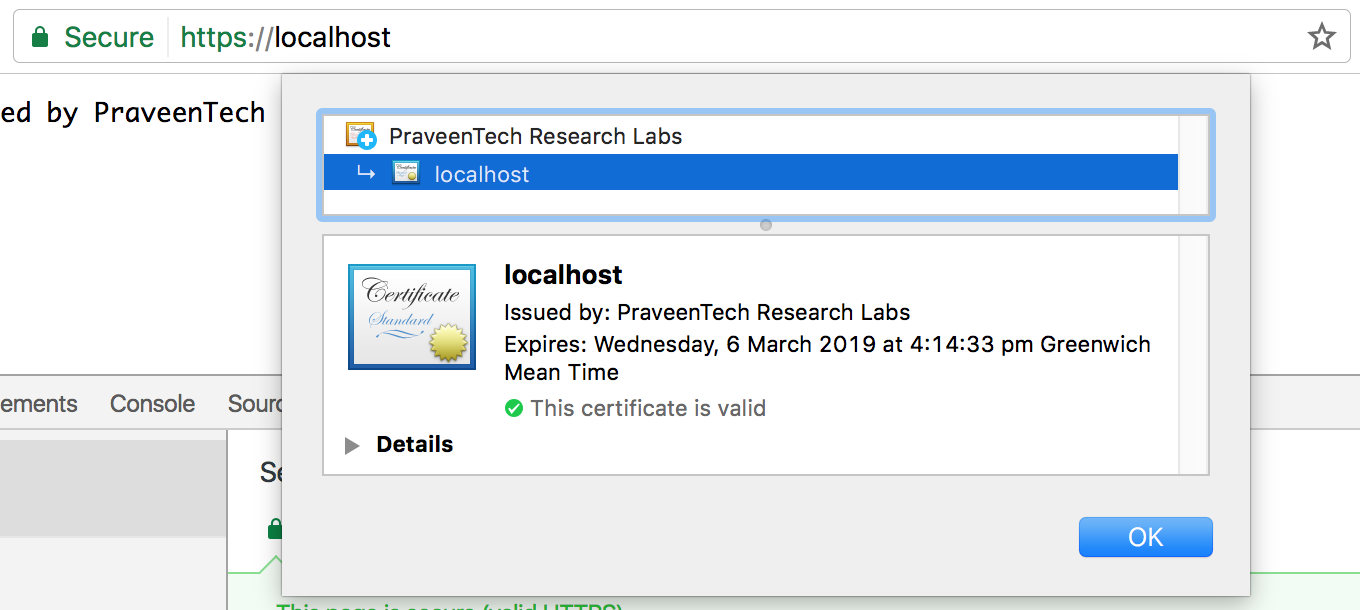
Email Address []: [email protected]Once you complete the above process, you will get a new file rootCA.pem, which is the Root Certificate Authority. In the Mac, you can see it this way:

Installing the Root CA
Now the tricky part is to install the Root Certificate Authority as a trusted certificate. Open Keychain Access in Mac and click on File » Import Items and add it to the Keychain. 🔐
Making Mac to trust your certificate has a bit extra process. Go into the Certificates section and locate the certificate you just added. Double click on it, enter the trust section and under "When using this certificate" select "Always Trust". 🔒
For Windows, you need to follow a different process, which I will post it later. And when you are using Firefox in Windows, you need to make Firefox "trust" your certificate by adding it into the repository, as Firefox maintains its own trusted list of certificates.
Creating the Domain Validated Certificate
This process needs to be done once for every domain you have. Let's say, now we are going to use localhost domain. These are the steps that are supposed to be followed.
Create a 2048 bit encrypted key for localhost.
openssl genrsa -out localhost.key 2048After creating the key, you need to issue a Certificate Signing Request. This is the CSR, you will require to merge the rootCA and your certificate.
openssl req -new -key localhost.key -out localhost.csrThis asks you a series of interactive questions like before. Make sure you follow this step correctly, else it won't work for your domain.
Answer all the common questions like Country, State/Province, etc. but when it comes to the Common Name, make sure you give localhost.
You are about to be asked to enter information that will be incorporated
into your certificate request.
What you are about to enter is what is called a Distinguished Name or a DN.
There are quite a few fields but you can leave some blank
For some fields there will be a default value,
If you enter '.', the field will be left blank.
-----
Country Name (2 letter code) [AU]: UK
State or Province Name (full name) [Some-State]: England
Locality Name (eg, city) []: Newcastle upon Tyne
Organization Name (eg, company) [Internet Widgits Pty Ltd]: PraveenTech Research Labs
Organizational Unit Name (eg, section) []: Security
Common Name (e.g. server FQDN or YOUR name) []: localhost
Email Address []: [email protected]

Please enter the following 'extra' attributes
to be sent with your certificate request
A challenge password []: Praveen
An optional company name []: PraveenTech Research Labs
Now, with the help of the rootCA.key and rootCA.pem, we will create a certificate. You should make sure that the certificate you create should be valid for less than the validity of the root certificate.
openssl x509 -req -in localhost.csr -CA rootCA.pem -CAkey rootCA.key -CAcreateserial -out localhost.crt -days 735 -sha256After the above process, you will have another file localhost.crt. This is the certificate encrypted with SHA 256-bit Algorithm and trusted and self-signed by you.
Finally, in the directory, you should have these files:
localhost.crt       Localhost Signed Certificate
localhost.csr       Certificate Signing Request
localhost.key       Localhost Certificate Keyfile
rootCA.key          Root CA Keyfile
rootCA.pem          Root CA Printable Encoded Module
rootCA.srl          Root CA Serial Number
Sample Node JS Server
The main file we need now is the localhost.crt, which can be installed in servers to serve the page. For now, I am going to use a simple server using NodeJS.
Create a 📄 server.js in the same directory with the following contents.
var https = require('https');
var fs = require('fs');

var options = {
  key: fs.readFileSync('./localhost.key'),
  cert: fs.readFileSync('./localhost.crt')
};

https.createServer(options, function (req, res) {
  res.writeHead(200);
  res.end("SSL Provided by PraveenTech Research Labs. 😜");
}).listen(443);
And voila! We have our very own 🔒 https://localhost/ secured! 😎


Hope the article was interesting and informative. Let's discuss more in the comments below and once again, until next blog post! 😊